


In a previous post I showed you how to use the Russian join to make a Magic Ball with your yarn scraps.
But maybe you don’t want to join your scraps in advance! What if you want to start crocheting right away, and join your yarns as you go? No problem! Today, I’ll show you how!
I’ll show you a technique for joining yarns as you crochet with no knots. First, I’ll show you in photos… then I have a video for you!
How to crochet yarns together
First, crochet until you have about 3″ remaining in your current yarn (shown here in brown):
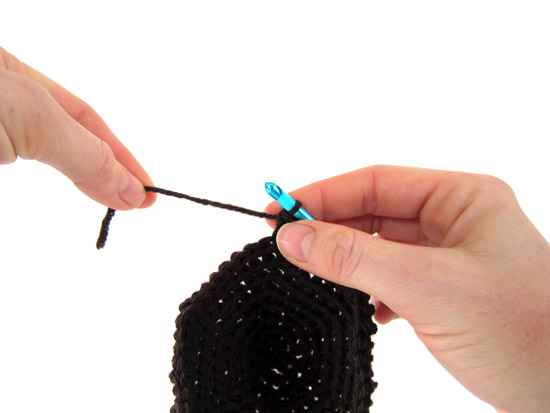
Then, hold up your new yarn (shown in yellow) so that the new yarn extends beyond the tail of your current yarn:
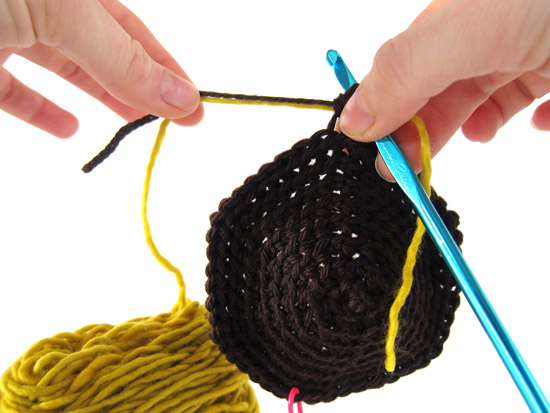
Holding the two yarns together, crochet a stitch:
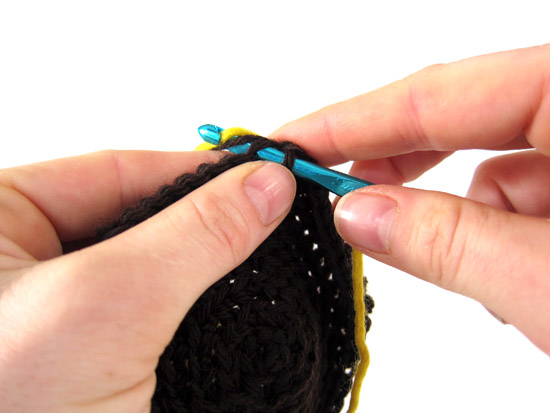
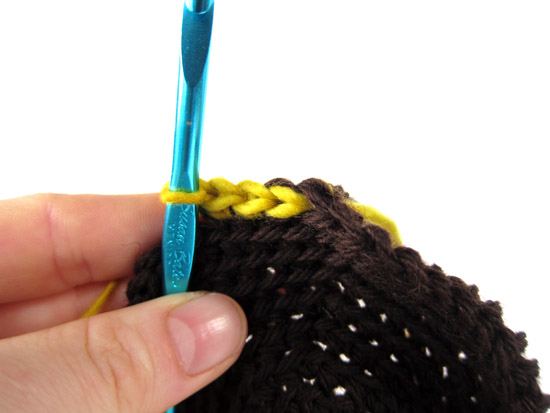
Now, drop the old (brown) tail of yarn…
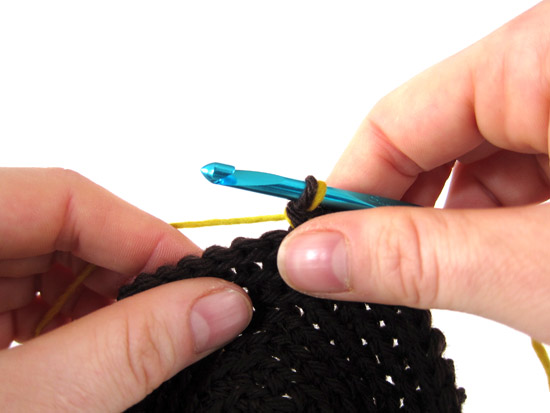
… and continue to crochet with your new yarn!
Ta da!
The yarns are secure… you don’t need to do anything else. Just let the tails hang on the inside of your piece!
And for the video…
Just in case you want to see it in action:
To view larger, click ‘play’, then the rectangle in the lower right-hand corner.
So handy!
In this post, I’ve used this technique to change colors of yarn, but it’s also a great way to change yarns… even if you’re just finishing one skein and starting another (of the same color).
I also use this technique while crocheting with two strands together. Just add one new yarn when one is about to end… easy!
And I do this when knitting, too!
One possible drawback to this technique is that you do get one stitch using both yarn colors. If your design calls for a “clean” color change – where you don’t have that blending of colors in one stitch – then take a look at this post on changing colors with single crochet. It’s also easy!

Here are handy links to all the posts about yarn. . .
- How to Join Yarn with No Knot
- 3 Ways to Join Yarn without Tying a Knot
- What to Do If There’s a Knot in Your Yarn
- How to Work with Eyelash Yarn
- How Much Yarn Do I Need?
- How to Calculate Yarn Weight from Length
- How to Make a Magic Ball
- How to Use a Ball Winder
- Using a Nostepinne Replacement to Make a Center-Pull Yarn Ball
- How to Make Yarn from Fabric Strips
- Dye Yarn with Wilton Icing Dye
Return to the main table of contents for Let’s Learn to Crochet Amigurumi.
Move on to the lessons for the basic crochet stitches.
Happy stitching!

I can never get the russian join to work because I work with one ply or 2 ply yarns. So this is was I resorted to, and hoped it would be okay. but now seeing you even showed us how to. I’m so happy to be almost done!
I’ve never tried this technique for joining yarns as I crochet, thank you, I like it this way.
another excellent lesson, thanks Stacey 🙂
I haven’t tried this particular method before – will have to give it a try 🙂
Stacy …. Yes it does hold! I have had no problems at all!
I love your way of connecting the new yarn, my question is? What about the tail’s just hanging? How do you work them in when it’s not possible just to let them hang, like on an afgan?
Thanks so much, Sandy
Hi Sandy- Most of what I crochet is stuffed animals, so the tails can just hang, and they go on the inside of the piece with the stuffing. If you’re doing something like a blanket (where you can see both sides), then you’ll want to weave them in like you would any other end!
That’s amazing! Whenever it comes to joining a new ball or changing yarn I always feel a bit uncomfortable with the little knot it leaves behind! No more lumpy little knot, this has just cast a little ray of enlightenment upon me 🙂
Thankyou so much I’ve tried for many yrs. to get this, wala..
Hi! Stacey…I am wondering if you would be able to help me out here..i have this adobe photoshop c6..but I have no idea how I can do the white background..would you just point out to me..what I would be looking for..sooo confusing..:(
Hi Madonna-
There isn’t a ‘white background’ button… you’ll need to use a combination of effects. This blog post should help you out.
This is one of those tips that I read and can’t work out why I never tried it before. Your explanation makes it sound so simple and obvious!
Quick question (I hope) – when you are crocheting the next round, do you go into the top of just the new (yellow) yarn or both the yellow and brown?
Is there an equivalent that works neatly for trebles?
Pingback: I Crocheted a Blanket |
All I can say is this: so easy! Thank you.
I am so beginner at crochet. I am making a simple blanket for my friends baby. When you join the new yarn, what do you do with the hanging left over pieces? A blanket you will see both sides, so it’s not like I can hide it.
Also, I tied knots on another project. What can I do with the hanging string. I don’t want to cut too short and over time it unravels.
Anything will help!
Thank you!
You need to weave them into the back of the blanket. Just thread the tail onto a tapestry needle and start threading it into the back of the existing stitches. I like to change directions a few times to make it extra secure.
You have such an easy way of explaining. I see that you mentioned crocheting with two strands together. This has been a night mare for me. I would love to crochet a rug. I just can not keep the yarn from tangling. Is there an easy way of doing this?
I find it helps not to pull too much yarn out of the skein at once. I usually crochet with center-pull skeins and I just keep them side by side and pull out just a foot or two at a time.