


Update! If you want the easiest method for starting your amigurumi (easier than any version of the Magic Ring) try a sloppy slip knot. I started using it a few years ago and I’ll never go back to a Magic Ring.
Has the magic ring method for beginning to crochet in the round gotten you all tied up in knots? No worries! I’m going to show you a new and super-easy method for getting an adjustable (magic) ring to begin crocheting your amigurumi. First, I’ll show you in photos, but scroll down if you’d rather just watch the video!
In this technique, you begin by making a slip knot, then creating the adjustable loop. With this method, there are less loops flying around, so it’s more accessible to beginners. Who knows, it may become your favorite!

Step one: make a slip knot
Start off by getting the hook and yarn called for in your pattern.

Then, make a slip knot with about 6 inches remaining at the tail, and insert the hook into the slip knot.

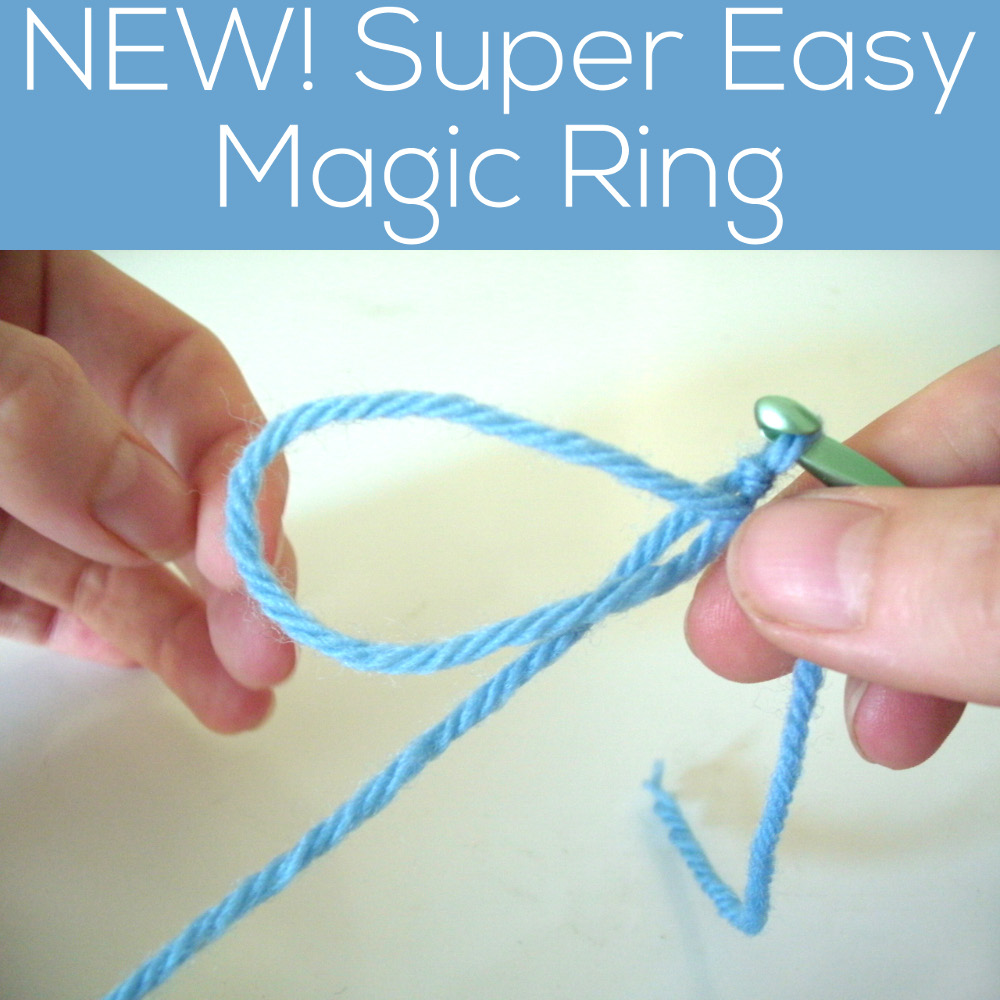
Step two: make a loop
With that 6 inches you left in in the tail, make a loop, as pictured:

Step three: crochet into the loop
Pretend that GIANT loop is just one crochet stitch. Crochet into it six times (or do however many stitches called for in your pattern). To single crochet one stitch into the loop: insert your hook into the loop, wrap your yarn over the hook and pull through the loop, then wrap your yarn over your hook again and pull through the two loops on your hook! Repeat this until you’ve crocheted all of your stitches! Your piece will look like this:

Step four: pull, and you’re done!
To close up the hole, pull on the tail!

You’re done! Hooray!
If that went by too fast, have a look at the video I recorded of the technique:
I hope you found today’s post useful for demystifying the magic ring!
If not – seriously – just use the sloppy slip knot. 🙂

Here are handy links to all the posts about working the first round of your crochet pattern. . .
- Sloppy Slip Knot – the Easiest Way to Start Amigurumi
- Magic Ring (if you must – but it’s not as easy as the sloppy slip knot) 😁
- How (and Why) to Crochet through the Back Loop
- How to Find the Second Chain from the Hook
Return to the main table of contents for Let’s Learn to Crochet Amigurumi.
Move on to the lessons for round two and beyond of your pattern.
Happy stitching!

Neat, this looks similar to the crochet cast-on I do when I’m beginning a knitting project that starts with a small circle. I used it on a marketbag and was really happy with it!
Stacey! This is so genius, I had to repost it on my blog. Great job! Fantastic! 🙂
http://thesexyknitter.blogspot.com/2011/08/stacey-trocks-new-magic-ring-for.html
That is brilliant! I crochet a lot of hats and can’t wait to try this method of the magic ring.
Thank you so much, you have made this elusive technique very understandable! I thought I’d have to do the chain 2 – 6 sc in second chain for the rest of my amigurumi days 😀
AHHH!! FINALLY a web post that I can follow and is clear and precise! Thank you!!!!! It’s taken me ages to find a tutorial for making a magic ring without ending up in knots! Thank you so so so much!
This magic ring is so much simpler than the one I learned previously! Thank you!
Brilliant I am going to try this out !
Thank you.!!!
I cant wait to try it. This is the best description. I love the step by step pictures. Again I thank you.
Of all the magic circle tutorials I’ve seen this one was great. Very easy to understand. It will be my fav way.
Pingback: Your World Needs More Cuteness: Spring Daisy Crochet Patterns | Squirrel Picnic
This is so much easier than the way I learned! Thanks so much for all your kind info. Tried your Craftsy class: Design Your Own Amigurumi, but it cut off toward end of end lesson. Boo on that.
So sorry to hear you had some trouble with the class! Feel free to email help@craftsy.com, they’re great with technical support 🙂
my friend taught me but i forgot and this way is way easier thank you
Thank you so much for this! I couldn’t even count how many times I tried the conventional method and failed. I was actually in tears at one point! (sad I know) But this I got right the first time I tried and it’s going to be the method I use from now on! Thank you, thank you, thank you! :3
So happy to help! 🙂
Pingback: Hodge Podge Craft » I heart learning to crochet (first project)!
Thank you, thank you, thank you!!!!!! OMG, that was SO EASY! I always dread the magic circle. It can take me hours and dozens of attempts to pull it off without knotting up. I will no longer fear the magic circle!!!
I can’t figure out how to use the magic circle instead of the slip stitch to make to circle. my pattern says to chain 3 then make 11 double crochet into ring. After I make the magic circle do I chain 3 then where do I make the 11 dc?
The magic ring replaces the slip knot, so you would dc into the circle you create. However, because the dc is taller than the sc, I wouldn’t recommend this technique… I would suggest the sloppy slip knot!
How do I increase on a magic circle? My instructions say sc in the next 3 stitches, inc/rpt aound (15 sc) thank you
The magic ring creates 6 sts in the center (usually), so to continue the next round, you will treat these stitches as you would any other single crochet.
Pingback: Pizzelle Crochet Pattern | Squirrel Picnic
I couldn’t figure out how to crochet into the loop. Do I use the “tail yarn”, or the working yarn? I tried both ways, and when I tried to tighten it either way, I ended up with knots. What am I doing wrong?
Definitely use the working yarn. I actually prefer the sloppy slip knot – you might want to try that instead of the Magic Ring. You can find a terrific tutorial here. https://www.shinyhappyworld.com/2017/06/the-sloppy-slip-knot-how-to-work-in-the-round-with-no-hole.html
I have spent a month trying to do this from utube n almost gave up. I tried one more time n found your site. u make it look easy n now I can do it. so glad I tried one last time…I book marked you site haven’t check it all out but I plan to….. thank you thank you Teresa Porter
Thank you!!!!!!!
This “Old Lady is AMAZED. I gave up all crochet patterns that showed Magic Ring. I’m back to crochet again. THANK you for for the step by step instructions I could print. Video instructions are not my favorite.
Wow! You should get an award for this one, I love it, so easy, I’ve avoided projects simply because I was too lazy to look up once again how to do the magic ring. I can never seem to remember it correctly, but this way is so simple I’m sure it’ll stick after one time. Thank you so much!
You have the easiest explanation to the magic circle . I tried different you tube tutorials , no luck . Once I saw the images you posted and written instructions , I was able to get it right away ! Thank you so much !